 Step 6 - Updating the Database
- Rather than overwriting the original Northwind database, let's create a new one. To do this, go to the project's app.config file and in the connectionStrings section, change the connectionString setting for EntityDataModelContainer from Northwind to NorthwindCF:
<connectionStrings>
	<add name="EntityDataModelContainer"
	connectionString="data source=(local);initial catalog=NorthwindCF;integrated security=True;MultipleActiveResultSets=True"
	providerName="System.Data.SqlClient" />
</connectionStrings>
- From the Tools menu, select NuGet Package Manager | Package Manager Console. This displays the Package Manager Console (PMC):

Note: If you are creating a .NET Standard Business Object library, make sure you have the Entity Framework Core tools installed. To do this, enter the following command in the Package Manager Console and press return:
Install-Package Microsoft.EntityFrameworkCore.Tools
- At the Package Manager Console PM> prompt, enter the following command and press return:
PM> Add-Migration Initial
After a little while, the following text appears in the PMC:
Scaffolding migration 'Initial'.
The Designer Code for this migration file includes a snapshot of your
current Code First model. This snapshot is used to calculate the
changes to your model when you scaffold the next migration. If you make
additional changes to your model that you want to include in this
migration, then you can re-scaffold it by running 'Add-Migration
Initial' again.
The first time you run this command, it adds a new migration class to your project containing code that creates tables in your database that match the structure of your entity classes.
- You can see this class in the Solution Explorer by expanding your project's Migrations folder. The file has a date/time prefix and a suffix with the name you specified in the Package Manager Console (in this case, Initial):

The generated migration class has an Up method containing code that implements the data model changes. It also has a Down method that rolls back the data model changes.
You can name a migration whatever you want, though descriptive names such as Initial and AddCustomerTable are best.
- Now to create the new database, enter the following command in the Package Manager Console:
PM> Update-Database
After a little while, you will see the following text displayed in the PMC:
Specify the '-Verbose' flag to view the SQL statements being applied to the target database.
Applying explicit migrations: [201801060802157_Initial].
Applying explicit migration: 201801060802157_Initial.
Running Seed method.
- Now, launch SQL Server Management Studio and check out the new database. For example, notice in the Orders table, the CustomerID and ShipName columns are not nullable, based on setting the Required check box in the Business Layer Generator:

- Notice there is also a table named dbo.__MigrationHistory. The Migrations history table is used by Code First Migrations to store details about migrations applied to the database.
Now you can make changes to your entity classes, run Add-Migration <xxx>, then run Update-Database to make additional changes to the database in a Code First workflow.
Repopulating the NorthwindCF Database
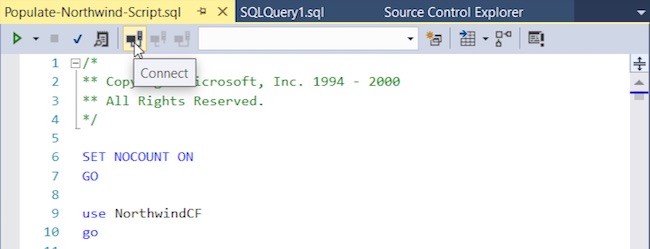
Since we created a new NorthwindCF database, we need to populate it with data so we can continue with the Jump Start. To help with this, we have created a script you can either run in Visual Studio or SQL Server Management Studio, which can be found at this location:C:\Program Files (x86)\MM .NET Framework (version)\MM .NET Framework Wizards\Populate-Northwind-Script.sql- To run the script in Visual Studio, from the File menu, select Open | File... and open the script file listed in the previous step.
- To connect to the new NorthwindCF database, click the Connect button at the top of the script panel:
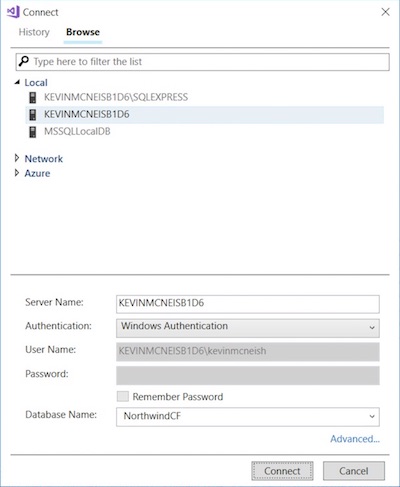
- In the Connect dialog window, select settings to connect to the NorthwindCF database, then click the Connect button:
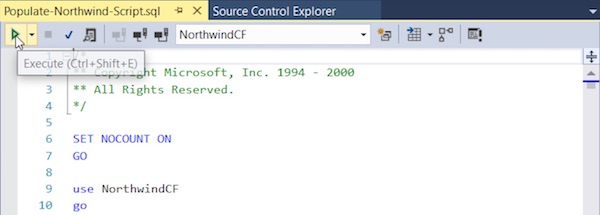
- Next, click the Execute button at the top of the script panel to run the script:
- When the script is finished executing, you should see the message "Command(s) completed successfully." In the Script messages at the bottom of the Script panel.

Comment or report problem with topic